Showing posts with label hands-on. Show all posts

Saturday, November 21, 2015

Macaroni Grammar

For the past few weeks during our language/grammar studies, we have been learning and mastering rules for punctuation, especially commas. So, before we began to learn about the use of quotation marks in our writing, I wanted to give my students some extra practice that didn't consist of a workbook page. So, I took some sentences, expanded them as I typed, and broke out some macaroni noodles I had to make the lesson more fun and hands-on!


My students glued elbow noodles for apostrophes and commas, and ditalini noodles for periods. When I copied the papers I made, I enlarged them onto 11x17" paper so the words were larger and allowed for room for the noodles. 

I had my students come up to the table to take some of each noodle that they put on a plate and we used white glue to attach them. The little orange bins came from the Dollar Tree, in case you were wondering :)


I created a FREE version for you to do this with your students too! Since I work in a Christian school, there are two worksheet options included: one for Christian classrooms, and one not. The little signs are also included for you too! To download, just click the picture below!


Monday, April 20, 2015

Giant Multiplication Chart!

Thanks to the amazingly creative Mr. Greg over at Kindergarten Smorgasboard, I have such a fun activity to share with you today!

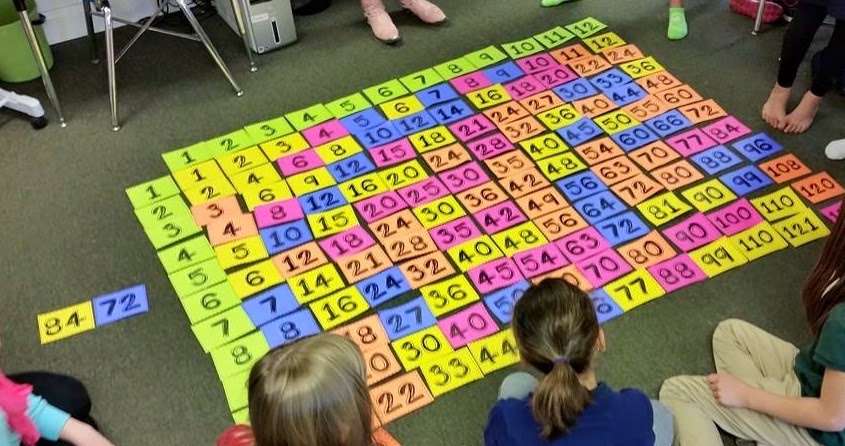
I saw him posting all over his Facebook and Instagram about completing a giant 100s charts with his 'staches, and instantly wanted to do something fun like this with my class. Since we are in 3rd grade, a 100s chart was too easy, so I made a multiplication chart instead. It took a lot of paper, ink, & cutting, but the result and student excitement was well worth it!

Here's a look at how we put it all together and how it ended up!


I printed the main header numbers 1-12 twice on the green paper from Astrobrights. I printed the rest of the rest of the numbers on pink, yellow, orange, and purple paper that I just put in random order. I recommend using cardstock for durability over the years, but I used what I had and for now it was fine. Hopefully it will hold up for a least another few years!

I laid out the 1-12 headers myself on the floor and explained the activity. I gave every student several number cards and then let them work. I didn't do anything the rest of the time but take pictures. The students took charge and did everything and I was SO proud of how they worked together AND KNEW THEIR FACTS! It was SO much fun - we will definitely be doing this again soon!

I also had to show my colleague (who taught 3rd with me last year and is in Kinder this year) the pictures of the activity because it was so much fun. We decided to try the 100s chart with our Kinder Reading Buddies (which is her class) and we can't wait to try it out!

If you want to try this with your class, CLICK HERE FOR THE MULTIPLICATION CHART! I included the picture and printing tips for you in the file too :) ENJOY!


Saturday, March 28, 2015

Implementing & Integrating Multiple Math Concepts during MATH Stations

So, I wanted to follow up to my series on my MATH stations, but orginially planned to make the next post about division. But then I decided that instead, it would be probably more informative and beneficial to give you some more ideas on how you can incorporate them with other contents, especially as I have now moved into our unit over counting money & telling time. I still have many students working on mastering their multiplication facts, but I didn't feel that lingering in multiplication & division skills was necessary any longer. I especially felt this way as I gave our end of the unit Interview Assessment over the foundational skills and every single student reached mastery level! It was definitely time to move on (maybe even a tad overdue) and I wanted to take some time to explain how I am integrating the new unit while several students continue to work through The Multiplication Station. [if you missed any of those posts about my MATH stations, you can start here in reading them].

To quickly recap, the four MATH stations are: M- math facts, A- at your seat, T- teacher time, & H- hands-on. In my new unit, I am leaving the [A] station the same. Most students are still working through The Multiplication Station, so I have not changed that aspect. Four students have finished within in the past two weeks, so this gives me the opportunity to differentiate for them with higher-level skill practice. As students finish, it gives me an opportunity to continue differentiating based on the student and his/her skill level. It's also a great time to implement review of old skills.

[M] time in the unit is also basically the same. It's a time to continue to practice those facts, so students who demonstrated mastery and fluency on all of the facts through x12 won't lose what they've learned. It's also a time I can have them practice facts in other ways, such as through division, two- and three-by-one digit problems, and missing number equations.

[T] and [H] are the main areas I have taken and added in the new skills we are learning. Especially during [T]eacher time, can I teach concepts like time to the minute, other ways to say the time, and the ever challenging elapsed time. I am also simultaneously teaching money. I decided to move toward a "spiral" style lesson implementation (I guess we could call it that) by alternating the time and money lessons every other day. This way, I am teaching multiple skills at once, we are practicing them on alternate days, and students are staying completely engaged. For instance, on Monday I might teach a time skill while they practice money skills during [H]ands-on time. Then on Tuesday, I switch it and teach money skills while they practice the time skill they learned the day before in [H]ands-on time. Then switch again on Wednesday, Thursday, and so on. I have really liked how it has been working so far, and as I said in the first post that MATH stations are a lot of prep work, I know that my students' excitement, engagement level, and comprehension levels have been completely worth it. I also have reaalllllyyy enjoyed watching them have fun in their learning during this time, so it has been fun for me as well!

Here's some pictures and examples of what we've been up to this week, as well as interactive lessons I used in the past that could easily be integrated as I mentioned above. I am already thinking that next year I will alternate and "spiral" teach my lessons so I am not focused on "chapters" and "units" but am just teaching the overall math skills my curriculum teaches in our MATH stations format. I am excited for summer so I can sit down and really think about, and plan it all out!

Okay.. now for the fun part for real, enough of my talking... my students in action!


After a day of working with some manipulative clocks to make times and talk about the parts of a clock (just to awaken those skills) during teacher time one day, students worked on these clock flaps during [H]ands-on time. These are from Blair Turner, once again...


I love how the student above extended the clock hands and used a highlighter to show exactly where the hands are, just as I taught them :)


Above, the students who finished The Multiplication Station already (and are my higher level thinkers) worked on Math Menus from Schoolhouse Diva during [A]t your seat. I was able to choose which menu and which differentiated worksheet they used to practice money skills. They did fabulous and loved it!


 You can see some students are working on two different things at the same time.

GIANT coins from The Dollar Tree toy section make counting money way more fun! 


These students above using the worksheet are again my higher level thinkers. They worked on a more advanced workbook page (I feel obligated to use because parents paid for them, even though I really dislike our math curriculum)... so I gave them the option of using manipulatives and writing on the table to make it more engaging. 

Other students worked below to count coins with Lucky Little Learner's INB money activities.


I also added the option of them being able to make money amounts with the giant coins using cards I have from another activity I made. They are from my Fast Food Money Match in my TpT store. You could easily print some up and do the same! This student is working on this during the [H]ands-on station.

These students below are using my Problem Solving Math Mats to practice problem solving skills related to multiplication and division during the [H]ands-on station. I loved her stance - she had her hand on her brow, thinking really hard!


Here's another look at activities in The Multiplication Station. A deck of cards (without the face cards) makes for a fun game to practice facts!


This one dug out an old school file folder game I made to practice division facts. Carson-Dellosa provided this one, and so did my sweet Crayola skills!


The above and below images show an example of [M]ath fact practice. I used blank INB flaps (again from Blair Turner) and challenged my to students to practice "tough" facts. You can read below that this learner copied in my directions exactly from the example I made.... she rocks! :)

 Another old school fact practice.....Tupperware flashcards!

(sorry for the blurriness!)
 These fact family houses are from the beginning of the year, when we review addition & subtraction skills. If you want to implement MATH stations in other unit studies or grade levels, multiplication & division could easily be replaced by addition & subtraction. These lessons from Lucky Little Learners could easily be used during the [M] or [H] stations.


These are from our Geometry unit we worked through before starting MATH stations. I am thinking that next year, I would introduce the vocabulary flaps you see here and the shape attribute flaps below (all from Blair Turner) would be taught during [T]eacher time. I would then have the [H]ands-on station activities and [A]t your seat work relate to our study also, while they practice either addition, subtraction, multiplication or division facts at the [M]ath fact station.


We also took a Multiplication Scoot early in the week during [M]ath fact time that I turned into an assessment grade for multiplying larger numbers. Here's a preview of it:


My class (of 13 girls & only 2 boys) SQUEALED when they saw we were doing another scoot. The LOVE them! I just posted it in my TpT store if you could use one too!


Again, most of these pictures were taken during the past week when I began teaching the new unit. There is a lot going on during our hour (or so) of MATH groups... and I absolutely love it!

I hope all of this inspires you with some more ideas of how you can implement and integrate MATH stations with your kiddos across multiple units of study! Share some below if you already do this, or if it got your wheels turning! I'd love other input and ideas!!


Sunday, February 22, 2015

Multiplication Fact Mastery: part two


So if you read the first post in this series, you saw how I introduce the basis of multiplication to my students with hands-on lessons...

After this, we connected what we did in making equal groups with manipulatives to repeated addition. We talked about it using several examples of multiplication problems and made the connection back to the previous day's lesson when I showed them this concept. Then, we worked through our workbook page that connected those repeated addition sentences to multiplication sentences. It was a simple page that many of my students complained was "too easy" (a phrase I reeallly don't like!) but was a perfect segue into future lessons. We did it as a whole group and talked through all of the connections we made as we worked.

Next, I introduced my students to the rules for the zeros and ones facts. They were SO excited to be starting multiplication facts and these two rules are a perfect introduction to the different rules and "tricks" for each set of facts that they would be seeing during our station lessons.

On the same day I introduced these, we started making flashcards. I know that it would be easier to go to the dollar store or Target Dollar Spot and buy bunch of packs for the students to practice with, but where is the fun in that?? and also, how does that make them meaningful?? I want them to really belong to my students, so we make our own every year. Yes, they are time consuming. Yes, it can be frustrating and some prep work for you as a teacher. BUT, my students LOVE making their own. They feel ownership over those cards and much more responsibility for them because they know how much hard work they put into making them every day. They look forward to making them yet can't wait to finish them all to fill up their ring! It is DEFINITELY worth it!

Here's a sneak peek at what the beginning of that process looks like. I'll be describing it more in my next post!


I know this was a short post, but my next two will be big ones!

Stay tuned in just a day or two to see how I set up and started my MATH groups and the activities I am using in each station!


Sunday, January 25, 2015

Halfway Day!


Today was an EXCITING day! My students had NO IDEA what they were in for... and you might not be either! Our day was JAM-PACKED with activities and snacks all about HALF and it started as a complete *surprise*....

O-H So Blessed Halfway Day


Here's how it all began, back to the very beginning... Picture it, Warren, Ohio - Summer 2014:

My dear friend Laura (who is also the teacher to our pen pals) and I were having our monthly lunch date and were talking about our approaching school year. The 100th day of school was brought up and I mentioned how I didn't want to celebrate it this year, but wanted to mix it up instead (maybe with the 101st day, or something like that). Shortly thereafter, Halfway Day was born! We envisioned it as a day to celebrate the 90th day of school, being halfway to summer (!) and working with fractions.

Well, the idea sat and sat in the back of our minds for quite some time, with teacher busy-ness and whatnot. So in November, at another of our monthly lunch dates we brainstormed a list of ideas. Again, they sat dormant in the back of my mind until one day over Christmas break I looked at my calendar and realized that Halfway Day was just three weeks away! Panic set in and I got right to work on the computer!

Thankfully, my creative juices were flowing and several great ideas came to life on my screen! Once I got the pack done (for the most part) on my end, I emailed it to Laura, and she worked on her part. We met the next afternoon for several hours at Starbucks and PRESTO! we had this pack!
I couldn't WAIT to implement it! Especially because we planned it to be a COMPLETE *surprise* to our students! They had to figure out that it was Halfway Day based on a clue on the board. We didn't countdown to it or anything, like you might typically do for the 100th day.

Here's how the day began...

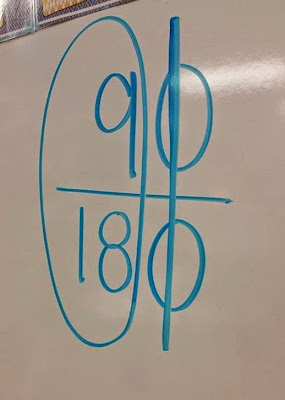
I put the fraction 90/180 on the board and told my students today was a special day... BUT, they had to figure it out!

             Halfway Day    

I had only ONE student get it - within just a few minutes! Several others came close, and I gave them a hint, as you see above, but eventually had to tell them. At first, they seemed a bit confused as to why we would celebrate this day. But when I told them there were snacks and lots of fun activities to do throughout the day... they were all in! ha!

Halfway Day

Halfway Day


Once we took our spelling test (which I made with a fun party graphic - included in the pack!) we jumped into our celebration! Right before our morning snack and recess time, I gave them their first snack.... Oreos! I found these birthday cake flavored ones when shopping at Target and they looked like so much fun! Everyone got two and had to twist them in HALF before eating them! And, of course, we had to eat all of our snacks on a HALF of a plate!

Halfway Day


While they were gone, I decorated the room with this Happy Halfway Day! banner (included in the pack in full color and B&W) and put HALF shapes and whirly-gigs all around the room!

Halfway Day

                             Halfway Day
Halfway Day
After snack, we jumped into our packet of activities! I took what you get in the Halfway Day pack and copied what I wanted to use with my class back-to-back, and then I stapled them to make mini booklets. It figured this would be the easiest way for us to work throughout the day, and copying them double-sided would save on some paper.

So we kicked it off with making equivalent fractions. Laura actually developed this part. The lesson is included in the pack. It show students equivalent fractions using a multiplication chart! Very cool! My class loved it, too, because we are just starting to learn multiplication, so anything connected to it just engages them like crazy!

Halfway Day
Next, students worked on their HALF facts and doubles facts in addition & subtraction, finished the other HALF of the word HALF, and took a HALF hunt around the classroom! They used their rulers to find and measure items, but could only record what measured to HALF inches.
'
Halfway Day

We ate some more snacks as we worked, including HALVES of pretzel rods, Nutter Butters twisted in HALF, and fortune cookies broken in HALF! We had some pretty ridiculous fortunes too, which made us all laugh!

Halfway DayHalfway Day
Halfway Day

We told time to the HALF hour, counted coins to find out if the total was worth more or less than a HALF dollar, and then spent time working with partners. We each wrote HALF of a shape poem an HALF of a story, and our partners finished the other HALF. Then, we shared them with the class.

Halfway Day


Halfway Day
We read a story all about fractions called My Half Day (by Doris Fisher) you can find on Amazon..

Our last activity of the day used the balloons I decorated the room with. I took our spelling words for next week and cut them in HALF. I wrote HALF on one balloon and HALF on the other. I put them throughout the room and each student had to get a balloon. Then, they had to find the person with the other HALF of their balloon and come to me to see if they were correct. By far the most fun part of the day! We will definitely be doing this game again! :)
Halfway Day

Halfway Day

Halfway Day

We ran out of time to finish our packet, but it also includes practice for breaking words in HALF as compound words, prefixes & suffixes, and by syllables! We also had a story to finish called "The HALVES and the HALF Nots," using HALF, HALVES, HAVE, and HAVEN'T correctly in the story where they were missing, but we just had TOO much fun and didn't get to finish! But now I know for next year to spend even more time on all the fun!

Well, that was our day! It was absolutely FANTASTIC and I am so thrilled about the success.. I can't WAIT to do it all over again next year! Such a celebration!! Next week we will spend time writing to our pen pals who had the SAME celebration, telling them all about our day! I made a "Happy Halfway Day!" writing paper included in the pack too :)

You can check out the pack by clicking below, if you want to spend your 90th of day of school surprising your class with an amazing day of HALVES! The pictures below allow you to see everything you get to celebrate YOUR HALFWAY DAY!!

Halfway Day

Halfway Day


Happy Halving!