Friday, September 11, 2015

Sticky Note Lesson Plans & Erin Condren

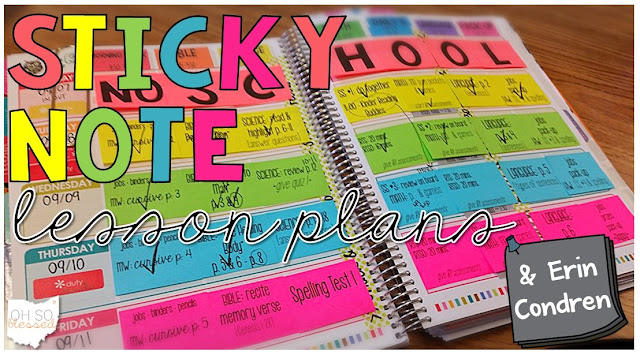
Lesson planning with post-it notes in the Erin Condren Teacher Planner

Hey friends!

I am so excited about this post because that picture above just makes my {teacher} heart SO HAPPY! I absolutely love lesson planning and looking at my lesson planner because, well.. just LOOK AT THAT! Those colors, those fonts, and that organization. It's too much! GAHH!

SOOOO... anyhow.. enough of my gushing... I guess I should start telling you WHY it's there!

If you've been on my Facebook page, Instagram, or Pinterest at all, it might look a tad familiar.

There's a post & YouTube video floating around that I've already done telling all about how I create my Erin Condren Teacher Planner with sticky notes.

However, I have been able to take this gorgeous masterpiece of a plan book... and improve upon it EVEN MORE! say whaaat!? I know! I didn't think this was at all possible either.. but it is!

So... if you first need to read the original post about how I did that... do that RIGHT HERE. RIGHT NOW.

Then come on back and read what's NEW AND IMPROVED!


So...let's play a game and see if you can SPOT THE DIFFERENCE:
Lesson planning with post-it notes in the Erin Condren Teacher Planner

Did you find it?

Here's what's new.... MY SUBJECT LABELS! noooww take a look!:
Lesson planning with post-it notes in the Erin Condren Teacher Planner

It may seem silly... but can I just say how WONDERFUL it is to not have to hand write almost anything in my planner these days!?!

Thanks to the genius of my friend Lisa over at Fourth and Ten and her beautiful Instagram post, I no longer have to write in my subject headers and times! Using Avery Return Address Labels [and all of the patience I can muster!] I created these subject and time labels for my planner! Now, I spend even LESS TIME setting up my planner week to week. I simply put in the labels, washi tape for our snack & lunch breaks, and I'm good to go.

Here's what a bunch of them printed out looks like:


I think I am even going to try doing my dates on them too so literally nothing is written in anymore. Another plus? If I mess up or decide to change something I can just cover it up with another and be none the wiser!

So, I know you might be asking "how do you make the labels in color?" Well, this is where that patience I mentioned [and don't have much of!] comes in. When you download and open the template [which you can get here for free from Avery] in Microsoft Word. I select the box in the template and go to "Format" >> "Shape Fill." Then, select the color you want the background to be. Of course, you can leave it white. But I went ahead and gave mine a rainbow pattern. Then, I overlay a text box [which I make translucent] and format my text. I copy and paste the text boxes to fill one column with the same label format. So, the first column is my red "Morning Work" label, the second is the orange "Bible" label, the third alternates "Science," "Health," & "History" in yellow since that's how I will be teaching it this year [rotating through each content over the course of the whole year] and then the last column on the page is the green "Math" label. Then, once I save the file, I close it and copy the entire file itself and paste it onto my desktop. I rename it (something I'll remember that corresponds) and change the text boxes to the times for each of those same subjects. That way the colors are already done and I just have to change the text and formatting.

I say it takes patience because Microsoft Word is finicky when it comes to layering and I spent a lot of time adjusting the text boxes so they would line up well. But, now that it's done it looks great and was well worth the frustration!

>>> If you click here, you can download one of my label files and give them a try to see what I mean. You'll need the font CartonSix so it looks right and go from there so some of the formatting is done for you! Remember..it's in WORD. I'm sorry!

PRINTING TIP >>> once you create those labels, you will need to save them as a PDF in order to print. The first time I went to print I didn't do that.. and they didn't bring with the color fill. So I have some pages of just plain white labels. Anybody want them!?

I bought the Avery Return Address Labels on Amazon... you can get a box of 2000 here and have them for at least 2 years, if not more.. it just depends how many you use a week. Right now, I use 19 a week, but if I print the dates like I think I will that will be 24 a week x at least 34 weeks of planning for 816 labels a year. 2000 divided by 816 is 2.45 years... not bad for about $7!

For your enjoyment, here's another look at the goodness of all the supplies I use when I am putting it all together...

Lesson planning with post-it notes in the Erin Condren Teacher Planner
You can see in the top right that I used labels to insert when I do our daily Read Aloud under other plans because I didn't have room elsewhere. It works great! I love that the post-it allows for TWICE the planning room. You can lift them up and jot notes, ideas, and changes underneath for future reference [and hide them with the post-it!]


Happy Planning!


Last Minute Lessons: Post Your Thoughts


Sometimes, the best laid plans happen on the fly. It happens for me quite a bit. I'm a spontaneous, just wingin' it, let it happen naturally kind of lesson planner. [wow, that sounds terrible!] BUT, I do plan. Don't get me wrong. I know what content I am covering and when. I know what I will expect my students to do. I know the rigor. But, I don't write scripts. I fit my lessons plans on post-its, for goodness sake. One post-it for a subject, and the whole week fits on a two-page spread. I don't list objectives or standards [I'm blessed not to have to!] I let God lead my teaching. He inspires me, He provides, HE has the BEST ideas!

So.. what does that all have to do with this post? Well, it's exactly what happened this morning and I' thought I'd share with you how it came about.

I was in the shower [the best thinking always happens there! right!?] and I was thinking about my science lessons. For a lot of the time, our lessons come straight from our science books that are a part of our school's curriculum. I find myself easily putting it off or skipping it some days because, well, it's boring. Don't get me wrong, the content is fantastic and we DO have fun with experiments sometimes (I'm working on that!) but our day-to-day lessons are just reading about it. It gets boring and let's face it.. if it's taught in a whole group, they aren't going to listen to me read it to them and Round Robin Reading isn't exactly a best practice. Just ask Jen Jones. So, in trying to solve my own problem and jazz up my teaching in content areas like science & health, I came up with a quick "Post Your Thoughts" informal assessment activity.

I quickly created a template for standard 3x3" sticky notes to fit on. I stuck them on the boxes [you can baarreelly see them in the pic up top, on the left] and labeled the post-its with my students' numbers [so they remained generally anonymous to their classmates when they posted their thoughts but I knew what their answers were] and assigned the reading.

They were to read a chunk from our science books on their own, at their own pace. Usually, we read things together in small groups or whole group, and we highlight important information that might be seen on a quiz or test. Since this was an independent study session, I laid out MY teacher copy and let them come over to look at it, if needed, where they could see the parts I had highlighted. After they got started and I explained how they would use the post-it notes, I let them start reading. After they were all engaged in reading, I then wrote the questions I had for them to find on the board. Why did I decide to wait? So they actually READ EVERYTHING, and didn't just skim in order to find the answers and be done.

So, each question was color-coded for a certain post-it [as you can see on the right]. When they found the answer, they wrote it on the corresponding sticky note and put it on the board right under the question.


As soon as everyone was finished, we talked about what we read, highlighted some important information, and answered those questions. My students read at their own pace, and I now have a small formative assessment piece to show their understanding. They did FANTASTIC! I was super proud of them, seeing as this was the first time we did something like this this school year.... and it's only the TENTH DAY! They loved it, and I definitely seeing us do this activity much more often!

So what do you think? Would you have your students "Post their Learning"? If so, you can grab my template for FREE >>>> right here!

Just print, copy, and cut in half to use! You could even laminate a set, and make them reusable year after year for just about any content area or reading assignment!


Thursday, September 10, 2015

Bucket Filling & The Bible


If you've never read my blog before today... WELCOME! My name is Tami and I teach 3rd grade at a Christian school in Ohio. I am passionate about educating our future generation, and especially doing so about our salvation in Jesus Christ.

When I head back to school, I make it point to start our year on a positive, God-honoring note. There's a BTS favorite picture book out there, you've probably heard of... Have You Filled a Bucket Today? by Carol McCloud. If you haven't, without ruining it, I'll just say that it sends such a positive message to students about how to treat others. But, in teaching at a Christian school and in-looking at the world from a Biblical perspective, I wanted to utilize this book to do just that. I started to think through the Bible and the more I read in the New Testament, the more I began to realize that Jesus IS the ULTIMATE BUCKET FILLER!

So, on the first day of school, I read this book to my students. We talk about ways to be a Bucket Filler, how we can treat others, and how it feels when we treat others kindly; showing them love. Then, I read them this verse, Matthew 7:12 [NIV]

"So in everything, do to others what you would have them do to you.."


You may have heard of this verse also as "The Golden Rule".... "treat others how you want to be treated." It is exactly what Jesus intends for us, to LOVE others the way we want to be loved. The way HE LOVES US. He is the ULTIMATE Bucket Filler, perfect and without sin. He showed everyone His Heavenly Father's love and did so especially by dying on the cross for our sins.

We spend time the first day studying this in my 3rd grade class to set a positive, Jesus-centered tone in our classroom.
I also have a plastic bucket I got one summer and have it hanging by the door to my room. I show my students that it is hanging there and it serves as our reminder to be a Bucket Filler to someone every day, just like Jesus. My students absolutely love this book and completely understand how to treat others kindly, and how not treating them kindly [or being a Bucket Dipper] is not a choice Jesus made. We strive to be like Him at our school, and this book takes that idea straight from the words and actions of Jesus Himself and makes them relevant for the brain and heart of an eight year old child.

If you teach in a Christian school, I hope this gives you a practical idea to implement in your classrooms to set a positive tone in your classroom. It would even be a great study for your whole school during Chapel!

I pray you are having a blessed beginning of the school year!