Showing posts with label teacher hacks. Show all posts

Friday, September 11, 2015

Sticky Note Lesson Plans & Erin Condren

Lesson planning with post-it notes in the Erin Condren Teacher Planner

Hey friends!

I am so excited about this post because that picture above just makes my {teacher} heart SO HAPPY! I absolutely love lesson planning and looking at my lesson planner because, well.. just LOOK AT THAT! Those colors, those fonts, and that organization. It's too much! GAHH!

SOOOO... anyhow.. enough of my gushing... I guess I should start telling you WHY it's there!

If you've been on my Facebook page, Instagram, or Pinterest at all, it might look a tad familiar.

There's a post & YouTube video floating around that I've already done telling all about how I create my Erin Condren Teacher Planner with sticky notes.

However, I have been able to take this gorgeous masterpiece of a plan book... and improve upon it EVEN MORE! say whaaat!? I know! I didn't think this was at all possible either.. but it is!

So... if you first need to read the original post about how I did that... do that RIGHT HERE. RIGHT NOW.

Then come on back and read what's NEW AND IMPROVED!


So...let's play a game and see if you can SPOT THE DIFFERENCE:
Lesson planning with post-it notes in the Erin Condren Teacher Planner

Did you find it?

Here's what's new.... MY SUBJECT LABELS! noooww take a look!:
Lesson planning with post-it notes in the Erin Condren Teacher Planner

It may seem silly... but can I just say how WONDERFUL it is to not have to hand write almost anything in my planner these days!?!

Thanks to the genius of my friend Lisa over at Fourth and Ten and her beautiful Instagram post, I no longer have to write in my subject headers and times! Using Avery Return Address Labels [and all of the patience I can muster!] I created these subject and time labels for my planner! Now, I spend even LESS TIME setting up my planner week to week. I simply put in the labels, washi tape for our snack & lunch breaks, and I'm good to go.

Here's what a bunch of them printed out looks like:


I think I am even going to try doing my dates on them too so literally nothing is written in anymore. Another plus? If I mess up or decide to change something I can just cover it up with another and be none the wiser!

So, I know you might be asking "how do you make the labels in color?" Well, this is where that patience I mentioned [and don't have much of!] comes in. When you download and open the template [which you can get here for free from Avery] in Microsoft Word. I select the box in the template and go to "Format" >> "Shape Fill." Then, select the color you want the background to be. Of course, you can leave it white. But I went ahead and gave mine a rainbow pattern. Then, I overlay a text box [which I make translucent] and format my text. I copy and paste the text boxes to fill one column with the same label format. So, the first column is my red "Morning Work" label, the second is the orange "Bible" label, the third alternates "Science," "Health," & "History" in yellow since that's how I will be teaching it this year [rotating through each content over the course of the whole year] and then the last column on the page is the green "Math" label. Then, once I save the file, I close it and copy the entire file itself and paste it onto my desktop. I rename it (something I'll remember that corresponds) and change the text boxes to the times for each of those same subjects. That way the colors are already done and I just have to change the text and formatting.

I say it takes patience because Microsoft Word is finicky when it comes to layering and I spent a lot of time adjusting the text boxes so they would line up well. But, now that it's done it looks great and was well worth the frustration!

>>> If you click here, you can download one of my label files and give them a try to see what I mean. You'll need the font CartonSix so it looks right and go from there so some of the formatting is done for you! Remember..it's in WORD. I'm sorry!

PRINTING TIP >>> once you create those labels, you will need to save them as a PDF in order to print. The first time I went to print I didn't do that.. and they didn't bring with the color fill. So I have some pages of just plain white labels. Anybody want them!?

I bought the Avery Return Address Labels on Amazon... you can get a box of 2000 here and have them for at least 2 years, if not more.. it just depends how many you use a week. Right now, I use 19 a week, but if I print the dates like I think I will that will be 24 a week x at least 34 weeks of planning for 816 labels a year. 2000 divided by 816 is 2.45 years... not bad for about $7!

For your enjoyment, here's another look at the goodness of all the supplies I use when I am putting it all together...

Lesson planning with post-it notes in the Erin Condren Teacher Planner
You can see in the top right that I used labels to insert when I do our daily Read Aloud under other plans because I didn't have room elsewhere. It works great! I love that the post-it allows for TWICE the planning room. You can lift them up and jot notes, ideas, and changes underneath for future reference [and hide them with the post-it!]


Happy Planning!


Monday, June 15, 2015

One Bulletin Board... all year long!

There is one common thing a lot of teachers seem to dread about their classroom.... BULLETIN BOARDS.

Now, I may be crazy... okay, okay, I AM CRAZY. But I don't mind bulletin boards one bit. I LOVE decorating them, finding fun colors and items to use, and thinking of a creative play on words for the title.

I think the one thing teachers get hung up on is hanging the paper and border every time. (you see what I did there!? #punnerd)  and for me, I only dislike it because I have a GIGANTIC bulletin board and an affinity for patterned wrapping paper. So recovering it every time takes about 2 rolls of paper and seems wasteful.


So this year, I decided to try putting up my paper and border ONCE and leaving it up all year, no matter what I changed it to for the season. I did this last year too, and it seemed to work well, so I thought I would document it for you and see what you think about it. It miiiight just make the task a tad less daunting for you... hopefully!


Here's some tips for how I did it...


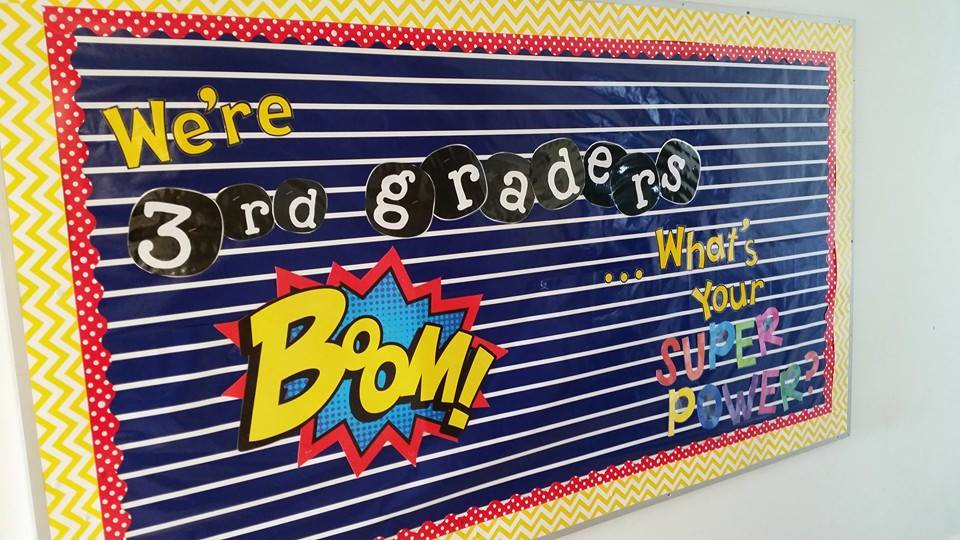
Choosing a neutral background is the most important.. which is why I listed it first. Something neutral is going to be able to go with a variety of themes, colors, and seasons. I chose this navy blue striped wrapping paper from Target. It's simple with clean lines and has the potential to match a lot of things.

The year started with a super hero theme, so I matched it accordingly with my borders and other decor::
This went up in August and stayed until November-ish.


I use white thumb tacks to put up my borders. This makes it easier for me to change them down the road if I want to, because removing staples is a pain. It is also super easy to hide them in the border and then they aren't really even seen then! Like the polka dot border above... I just put a tack right on top of a dot and boom.. camouflaged.

Bonus: less holes in your border when you take it down compared to staples.
Double Bonus: you don't need to use a staple remover, so you're less likely to rip it!


..and then change ONE of them. I changed the bulletin board a tad late into the year... and when it started to snow I used this idea I found on Pinterest. I left up the red polka dot border that I had used before and just changed the yellow chevron to gray chevron.... same background but a much softer look for winter with the gray. I changed one piece at at time and it was so simple, compared to taking it allll down and putting something new up.

This stayed up November-ish until March. Winter is long in Ohio!
Click the picture to download the writing prompt paper for FREE!

To make the snowglobe, I traced the clear plastic plates I bought at a party store and drew on the bottom part for the globe freehand. I traced them on cardstock and the students cut them out.

I took their pictures all bundled up in their winter gear in the hallway. By taking them horizontally so that my students' entire bodies were in the picture and printing them as a 4x6" photo, they were able to JUST fit perfectly inside the plate!

I let my students decorate the inside to MATCH their story (so we did the writing process and activity first) and then we made the snow globe.

I mixed white glue and shaving cream for puffy paint for the snow and we broke out the glitter to decorate the bottoms of the snow globes (if they wanted... which they all did, of course!)

After they were completely dry (this took a few days) I hot glued the edge of the plate the cardstock snow globe. It's important to leave a small edge beyond what you trace so that there is room for the plate and paper to attach well. Beware: this uses a LOT of hot glue!

To hang them, I attached a small loop of yarn to the back of the globe with hot glue as well, but that is completely optional, depending on how you want to display them!  This has been one of my most favorite craftivities to date! I highly recommend it!


It's not always easy... so think about it. I had to kind of plan before I could make this bulletin board. I needed something to keep the blue. It reminded me of the sky so that idea led to finding something with clouds, and a Pinterest search led me to the balloon idea, which inspired the title. A little planning goes a long way, if you take a bit of time to do it. So don't rush the bulletin board change. It's okay if you don't change it immediately. Your board is still cute if you wait a week!

Here, you can see I just changed the inside border but left the gray. I went from red polka dots to hot pink on the inside. A few white thumb tacks stand out, but still look cute.
This bulletin board stayed up from late March and into May.


 Don't try to overdue it. I let the borders and background colors speak for the design the most and add just a few touches. A few fun fonts for the title and that's all I needed. The bright yellow pops against the blue and the cloud from the last board stayed up.. then I just added in my students' writing craftivity and that was that. I put this up in May and it stayed up until the end of the year.


and that was that. I made it last all year. I bought those two rolls of wrapping paper for about $6 at Target and made it last all year. I strategically covered any tears or worn out spots with the other items I put up and it didn't look bad through all 9 months... and I didn't have the headache of putting up new paper every time I did a new one.


What do you think? Would this solve your frustration with bulletin boards? Would you try it!?
Let me know in the comments below!


Saturday, January 24, 2015

Erin Condren Teacher Planner: lesson planning with post-it notes!

Hey there everyone!

So several months ago I shared with you a blog tutorial on how to print onto post-it notes to transform your lesson plans in an Erin Condren Teacher Planner. Well, I know that giving (and taking) directions, is easiest to SEE what is happening, so I thought I would create a VIDEO to show you! A tad crazy (at least for me) because taping myself and talking to a webcam is a bit unnerving, but it was so much fun! Check out the video by clicking on the picture below!
 and PLEASE let me know your thoughts!


Then, you can grab the template I use from my TpT store (just click on the cover photo below)... I went ahead and it turned it into a permanent {FREEBIE!}


I hope you give it a shot if you have (and love!) an EC Teacher Planner and let me know how it works for you! I hope you absolutely LOVE it as much as I do! I find that it actually makes planning a *little* less daunting, sooo...HAPPY PLANNING! :)


Sunday, September 14, 2014

Erin Condren + post-its = LOVE!

So the other day I was handwriting my lessons on my gorgeous new Erin Condren teacher planner....
isn't it lovely!? {sigh}

when I became frustrated! I wrote something wrong and couldn't fix it! Plus... I am not a big fan of my handwriting and writing them out (seems to) take longer than typing them on the computer. Last year I used post-its and a daily At-A-Glance planner that I loved....

....but it just wasn't enough.

The Erin Condren planner (everyone on IG seems to have one!) is great because it is my calendar, lesson planner, attendance, and grade book all in one! But I still disliked writing my lessons.... until an idea hit me. I opened my desk drawer and found my mini post-its. I laid the stack on top of one of the spaces for a lesson in the week, and low & behold... IT WAS THE PERFECT SIZE! 

So I quickly got to work as soon as I could. I opened a file I have on my computer that has boxes already the size of the mini post-its for another use (I make my students reminders for different things to put in their binder... but I digress...)
 I copied the file and started moving everything around to see what I could fit on one page.
Since there are 7 blocks per day in the teacher planner, I put 7 of the boxes at the top of the page and 7 more at the bottom with a gap between the two to delineate the days. I duplicated the slide (I use Power Point) and added in text boxes. To help myself in the future so I don't get confused while typing, printing, and transferring it into my planner, I put titles by the post-it boxes for the subject they will go on, and labels for the day. I also wrote in (very small) the color that the post-its for that day are, just to help me remember. None of those will print onto the post-its themselves. They will be on the paper. They are just a good reference for me.

Here's what it looked like at first:
sticky note lesson plan template
then, in those gray boxes, I put my transparent text boxes with my lesson info for that day. You can format the font (any font you want!) to be bold, italic, shadowed, outlined, and any size you need! I continually duplicate my slides so everything is in the same format and I only have to change the lesson info.

Here's what a two-day page looks like all typed up:

sticky note lesson plan template

So...once everything is typed for the week, I can start printing. First, I print the blank template, which is slide 1 in the file I shared below (you didn't think I wouldn't share the love, did you!?!)

It looks like this:
sticky note lesson plan template

It is just light gray boxes the size of the mini post-its in the same place as the above slides. I print a few copies of those (so I can print faster) and put the post-its where the boxes are. As mentioned, I use different colors to delineate the days. The top 7 are one color, the bottom 7 another. I use 5 different colors for the 5 days of the school week.

Once all the post-its are on the papers, I insert the paper into the printer and all of my lesson plan info will print right onto the post-its! Then, I transfer them onto my planner, add some washi tape to show where snack & lunch are in our day, and that's it! The whole week is done! Then, when you don't get to something or need to switch it around, just move your post-its! You can also flip them up and write underneath of them, too, if you want additional notes/details, or want to write notes after you teach the lesson for future reference. It's that simple!


You could also use post-it flags for writing the date so your lesson planner is more reusable if you like. I use them under the date for notes specific to that day. and write the date in because I know I will probably use a whole new planner next school year. I use a pack I got at the Dollar Tree that come in a bunch of sizes, are transparent, and are only $1!  
So... here it is, all finished!
sticky note lesson planner

I just love the colors and the neatness of the fonts! What do you think?!

You can get the template for this here! It is a Power Point file :)

You can also view my YouTube video tutorial to see it in action!

I hope you find it as useful as I do and find that the instructions are clear. Feel free to comment or email me at mrstamilynnmo@aol.com if you have any questions!


Thursday, September 4, 2014

Spelling Homework and a Teacher Hack!

Most of us are probably into the full swing of school now, and mean-old-teacher- me is already assigning homework! I have an organizational system I use to keep it streamlined for myself and fun for my students, so I thought I would share! How do you keep spelling homework organized??

First, I use composition notebooks. I usually purchase these for my students since they are primarily inexpensive and it also allows me to prep them before schools starts. Students must complete all homework in the notebook on the nights it is assigned (Monday, Wednesday, and Thursday). They turn it in to me the next day with their S.O.S. Binders and I check them over. [I don't give grades on homework. They do it only for practice so they can have a successful spelling test on Friday and can earn a reward by staying in the Homework Club!]

I made this cover that I have my students color and decorate to their liking. I then use packing tape to tape them on and cover them with it completely so it lasts all year.

On the inside of the cover is a page of guidelines and rules for spelling homework that I also taped and covered with packing tape. 

Next, I put the first month's spelling homework choice menu. I have different options for September to May. This year I am putting them directly in the notebook so they have their choices with them when doing their homework (they are made to fit into the composition notebook). I copied them onto colored paper so they will be easier to locate, especially as we get father back into the book. 

Their Always Good Choices include a practice test (written or verbal), writing words 3x each, writing sentences, or typing their words on the computer. I also put in an option for them to email me their spelling homework to save paper and time!

This is 2 nights of homework that one student completed already this school year. Above is her computer fun words typed and pasted in. The bottom is 3x each in her neatest cursive. I *starred* them when I checked them over with different colored pens so I knew one day was different from the other.

.....and that's it! All I have to do once they are prepped at the beginning of the year is copy the choice menus and glue them in once a month. They have their spelling words in their binder each week, and just choose how they complete their homework at night. I only have to check them over - the rest is done for me! I find it pretty simple and after three years of using this system, I have a great rhythm and love it! I couldn't imagine assigning homework any other way! What do you think!? If you like this system, you can grab it over in my TpT store! Just click the picture below :)


Now, as promised.... a TEACHER HACK!
I saw on Pinterest a great idea for hanging items when there is a lack of wall space.... specifically: anchor charts! One teacher used magnetic hooks and a curtain/tension rod to hang on a magnetic surface. What a great space-saving idea! So I was at Wal-Mart the other morning and was taking a gander at the curtain rod section trying to recreate this idea when I stumbled upon the most magical invention I have seen this back to school season......

IT IS ALREADY DONE FOR US! and ........ drum roll please....
It is only $9! SAY WHAT!? I was so excited I bought it right then, took it to school and hung these babies! Best purchase of the year! GO GET ONE!


I hope you are having a successful start to your new school year!