Showing posts with label lesson plans. Show all posts

Friday, September 11, 2015

Sticky Note Lesson Plans & Erin Condren

Lesson planning with post-it notes in the Erin Condren Teacher Planner

Hey friends!

I am so excited about this post because that picture above just makes my {teacher} heart SO HAPPY! I absolutely love lesson planning and looking at my lesson planner because, well.. just LOOK AT THAT! Those colors, those fonts, and that organization. It's too much! GAHH!

SOOOO... anyhow.. enough of my gushing... I guess I should start telling you WHY it's there!

If you've been on my Facebook page, Instagram, or Pinterest at all, it might look a tad familiar.

There's a post & YouTube video floating around that I've already done telling all about how I create my Erin Condren Teacher Planner with sticky notes.

However, I have been able to take this gorgeous masterpiece of a plan book... and improve upon it EVEN MORE! say whaaat!? I know! I didn't think this was at all possible either.. but it is!

So... if you first need to read the original post about how I did that... do that RIGHT HERE. RIGHT NOW.

Then come on back and read what's NEW AND IMPROVED!


So...let's play a game and see if you can SPOT THE DIFFERENCE:
Lesson planning with post-it notes in the Erin Condren Teacher Planner

Did you find it?

Here's what's new.... MY SUBJECT LABELS! noooww take a look!:
Lesson planning with post-it notes in the Erin Condren Teacher Planner

It may seem silly... but can I just say how WONDERFUL it is to not have to hand write almost anything in my planner these days!?!

Thanks to the genius of my friend Lisa over at Fourth and Ten and her beautiful Instagram post, I no longer have to write in my subject headers and times! Using Avery Return Address Labels [and all of the patience I can muster!] I created these subject and time labels for my planner! Now, I spend even LESS TIME setting up my planner week to week. I simply put in the labels, washi tape for our snack & lunch breaks, and I'm good to go.

Here's what a bunch of them printed out looks like:


I think I am even going to try doing my dates on them too so literally nothing is written in anymore. Another plus? If I mess up or decide to change something I can just cover it up with another and be none the wiser!

So, I know you might be asking "how do you make the labels in color?" Well, this is where that patience I mentioned [and don't have much of!] comes in. When you download and open the template [which you can get here for free from Avery] in Microsoft Word. I select the box in the template and go to "Format" >> "Shape Fill." Then, select the color you want the background to be. Of course, you can leave it white. But I went ahead and gave mine a rainbow pattern. Then, I overlay a text box [which I make translucent] and format my text. I copy and paste the text boxes to fill one column with the same label format. So, the first column is my red "Morning Work" label, the second is the orange "Bible" label, the third alternates "Science," "Health," & "History" in yellow since that's how I will be teaching it this year [rotating through each content over the course of the whole year] and then the last column on the page is the green "Math" label. Then, once I save the file, I close it and copy the entire file itself and paste it onto my desktop. I rename it (something I'll remember that corresponds) and change the text boxes to the times for each of those same subjects. That way the colors are already done and I just have to change the text and formatting.

I say it takes patience because Microsoft Word is finicky when it comes to layering and I spent a lot of time adjusting the text boxes so they would line up well. But, now that it's done it looks great and was well worth the frustration!

>>> If you click here, you can download one of my label files and give them a try to see what I mean. You'll need the font CartonSix so it looks right and go from there so some of the formatting is done for you! Remember..it's in WORD. I'm sorry!

PRINTING TIP >>> once you create those labels, you will need to save them as a PDF in order to print. The first time I went to print I didn't do that.. and they didn't bring with the color fill. So I have some pages of just plain white labels. Anybody want them!?

I bought the Avery Return Address Labels on Amazon... you can get a box of 2000 here and have them for at least 2 years, if not more.. it just depends how many you use a week. Right now, I use 19 a week, but if I print the dates like I think I will that will be 24 a week x at least 34 weeks of planning for 816 labels a year. 2000 divided by 816 is 2.45 years... not bad for about $7!

For your enjoyment, here's another look at the goodness of all the supplies I use when I am putting it all together...

Lesson planning with post-it notes in the Erin Condren Teacher Planner
You can see in the top right that I used labels to insert when I do our daily Read Aloud under other plans because I didn't have room elsewhere. It works great! I love that the post-it allows for TWICE the planning room. You can lift them up and jot notes, ideas, and changes underneath for future reference [and hide them with the post-it!]


Happy Planning!


Last Minute Lessons: Post Your Thoughts


Sometimes, the best laid plans happen on the fly. It happens for me quite a bit. I'm a spontaneous, just wingin' it, let it happen naturally kind of lesson planner. [wow, that sounds terrible!] BUT, I do plan. Don't get me wrong. I know what content I am covering and when. I know what I will expect my students to do. I know the rigor. But, I don't write scripts. I fit my lessons plans on post-its, for goodness sake. One post-it for a subject, and the whole week fits on a two-page spread. I don't list objectives or standards [I'm blessed not to have to!] I let God lead my teaching. He inspires me, He provides, HE has the BEST ideas!

So.. what does that all have to do with this post? Well, it's exactly what happened this morning and I' thought I'd share with you how it came about.

I was in the shower [the best thinking always happens there! right!?] and I was thinking about my science lessons. For a lot of the time, our lessons come straight from our science books that are a part of our school's curriculum. I find myself easily putting it off or skipping it some days because, well, it's boring. Don't get me wrong, the content is fantastic and we DO have fun with experiments sometimes (I'm working on that!) but our day-to-day lessons are just reading about it. It gets boring and let's face it.. if it's taught in a whole group, they aren't going to listen to me read it to them and Round Robin Reading isn't exactly a best practice. Just ask Jen Jones. So, in trying to solve my own problem and jazz up my teaching in content areas like science & health, I came up with a quick "Post Your Thoughts" informal assessment activity.

I quickly created a template for standard 3x3" sticky notes to fit on. I stuck them on the boxes [you can baarreelly see them in the pic up top, on the left] and labeled the post-its with my students' numbers [so they remained generally anonymous to their classmates when they posted their thoughts but I knew what their answers were] and assigned the reading.

They were to read a chunk from our science books on their own, at their own pace. Usually, we read things together in small groups or whole group, and we highlight important information that might be seen on a quiz or test. Since this was an independent study session, I laid out MY teacher copy and let them come over to look at it, if needed, where they could see the parts I had highlighted. After they got started and I explained how they would use the post-it notes, I let them start reading. After they were all engaged in reading, I then wrote the questions I had for them to find on the board. Why did I decide to wait? So they actually READ EVERYTHING, and didn't just skim in order to find the answers and be done.

So, each question was color-coded for a certain post-it [as you can see on the right]. When they found the answer, they wrote it on the corresponding sticky note and put it on the board right under the question.


As soon as everyone was finished, we talked about what we read, highlighted some important information, and answered those questions. My students read at their own pace, and I now have a small formative assessment piece to show their understanding. They did FANTASTIC! I was super proud of them, seeing as this was the first time we did something like this this school year.... and it's only the TENTH DAY! They loved it, and I definitely seeing us do this activity much more often!

So what do you think? Would you have your students "Post their Learning"? If so, you can grab my template for FREE >>>> right here!

Just print, copy, and cut in half to use! You could even laminate a set, and make them reusable year after year for just about any content area or reading assignment!


Saturday, April 18, 2015

Check this out!

Hey friends!

I am so excited to tell you that the Erin Condren Teacher Planner that I love and have showed you on my YouTube tutorial is on sale for teachers for 25% off for all of May!! It's the perfect time to save some money and get a jump start for next school year!

BUT, you can also CLICK HERE and save $10 off your first purchase of one!! It's such a great deal for an amazing planner!

THEN... you can transform and streamline your lessons with sticky notes with my FREE template from TpT here.

Your lessons plans can look just like this, and shopping now can save you some moolah!


It is too good of a deal not to share it with you! I am heading over to snag some deals now! 
Happy shopping!


Saturday, February 28, 2015

MATH groups: [T] Teacher Time

Okay, so I've talked to you about [M] - Math facts and [A] - At your seat time. Now for the third station.. [T] Teacher time.

This is the station that can take a good amount of time to prep (who am I kidding, they ALL take time to prep!) but is also where the bulk of student learning is going to occur because here is where you can teach the strategies they need for solving multiplication facts. This is also where you can differentiate and modify your how you group your students according to what you are teaching.

Here's a quick look at my lesson plan book and some of what I taught during this time:


As you can see above, I have used this time to each the following concepts:

Vocabulary terms: product, factor, multiply, equal groups, multiples
Strategies: equal groups, arrays, breaking apart a factor, fact families, skip counting
Word problems
Multiplying 3 numbers
Order of operations

I use my dry erase easel, manipulatives, and interactive notebook activities from Blair Turner to teach most of the lessons in a hands-on approach. It keeps my students engaged and gives us just enough time together to work through a new concept but not too much time where they become bored and lose interest.


This week, I used Friday as our RTI and enrichment time. Yesterday, I worked with my higher students on using input and output tables. They were the first group I worked with. Then, I called other groups back and asked them if there was anything they were struggling with, not fully understanding, or just wanted extra practice with. I think asking them was important because I made them really think through their comprehension, and assess & reflect on their work so far. Their responses were fantastic! A few students said they felt good so I allowed them to take some extra time to study flashcards or play a game to practice skills. But, I had two groups that had students wanting to work on their x4 facts and some who wanted help understanding the 9s finger trick again. I was happy to spend that time helping them overcome their struggles. I may not have worked on those skills specifically during RTI time and it would not have been very meaningful or helpful to them.

Here's a look at that RTI time.. it was the first time I had ever tried writing on our kidney table with a dry erase marker.... their minds were BLOWN! It was so much fun to see their engagement through the rest of the lesson all because we wrote on the table!


Here we worked more on the 9s trick using our fingers. I drew it out on the table to make it more visual and concrete for them before we worked through it in a more abstract way.


One entire group felt good about their skills and comprehension within all the studied concepts thus far, and I agreed, so I started working on my summative assessment for the unit which I administer interview style. That is what you see below. If you click the picture you can find them in TpT store.


I'll be back tomorrow with the rest of my MATH station set up with the [H] station!


Sunday, January 25, 2015

Halfway Day!


Today was an EXCITING day! My students had NO IDEA what they were in for... and you might not be either! Our day was JAM-PACKED with activities and snacks all about HALF and it started as a complete *surprise*....

O-H So Blessed Halfway Day


Here's how it all began, back to the very beginning... Picture it, Warren, Ohio - Summer 2014:

My dear friend Laura (who is also the teacher to our pen pals) and I were having our monthly lunch date and were talking about our approaching school year. The 100th day of school was brought up and I mentioned how I didn't want to celebrate it this year, but wanted to mix it up instead (maybe with the 101st day, or something like that). Shortly thereafter, Halfway Day was born! We envisioned it as a day to celebrate the 90th day of school, being halfway to summer (!) and working with fractions.

Well, the idea sat and sat in the back of our minds for quite some time, with teacher busy-ness and whatnot. So in November, at another of our monthly lunch dates we brainstormed a list of ideas. Again, they sat dormant in the back of my mind until one day over Christmas break I looked at my calendar and realized that Halfway Day was just three weeks away! Panic set in and I got right to work on the computer!

Thankfully, my creative juices were flowing and several great ideas came to life on my screen! Once I got the pack done (for the most part) on my end, I emailed it to Laura, and she worked on her part. We met the next afternoon for several hours at Starbucks and PRESTO! we had this pack!
I couldn't WAIT to implement it! Especially because we planned it to be a COMPLETE *surprise* to our students! They had to figure out that it was Halfway Day based on a clue on the board. We didn't countdown to it or anything, like you might typically do for the 100th day.

Here's how the day began...

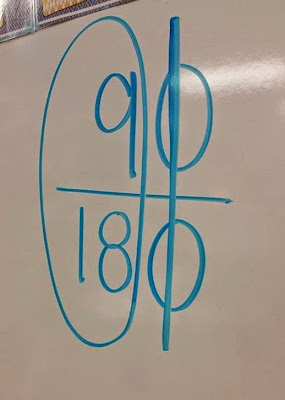
I put the fraction 90/180 on the board and told my students today was a special day... BUT, they had to figure it out!

             Halfway Day    

I had only ONE student get it - within just a few minutes! Several others came close, and I gave them a hint, as you see above, but eventually had to tell them. At first, they seemed a bit confused as to why we would celebrate this day. But when I told them there were snacks and lots of fun activities to do throughout the day... they were all in! ha!

Halfway Day

Halfway Day


Once we took our spelling test (which I made with a fun party graphic - included in the pack!) we jumped into our celebration! Right before our morning snack and recess time, I gave them their first snack.... Oreos! I found these birthday cake flavored ones when shopping at Target and they looked like so much fun! Everyone got two and had to twist them in HALF before eating them! And, of course, we had to eat all of our snacks on a HALF of a plate!

Halfway Day


While they were gone, I decorated the room with this Happy Halfway Day! banner (included in the pack in full color and B&W) and put HALF shapes and whirly-gigs all around the room!

Halfway Day

                             Halfway Day
Halfway Day
After snack, we jumped into our packet of activities! I took what you get in the Halfway Day pack and copied what I wanted to use with my class back-to-back, and then I stapled them to make mini booklets. It figured this would be the easiest way for us to work throughout the day, and copying them double-sided would save on some paper.

So we kicked it off with making equivalent fractions. Laura actually developed this part. The lesson is included in the pack. It show students equivalent fractions using a multiplication chart! Very cool! My class loved it, too, because we are just starting to learn multiplication, so anything connected to it just engages them like crazy!

Halfway Day
Next, students worked on their HALF facts and doubles facts in addition & subtraction, finished the other HALF of the word HALF, and took a HALF hunt around the classroom! They used their rulers to find and measure items, but could only record what measured to HALF inches.
'
Halfway Day

We ate some more snacks as we worked, including HALVES of pretzel rods, Nutter Butters twisted in HALF, and fortune cookies broken in HALF! We had some pretty ridiculous fortunes too, which made us all laugh!

Halfway DayHalfway Day
Halfway Day

We told time to the HALF hour, counted coins to find out if the total was worth more or less than a HALF dollar, and then spent time working with partners. We each wrote HALF of a shape poem an HALF of a story, and our partners finished the other HALF. Then, we shared them with the class.

Halfway Day


Halfway Day
We read a story all about fractions called My Half Day (by Doris Fisher) you can find on Amazon..

Our last activity of the day used the balloons I decorated the room with. I took our spelling words for next week and cut them in HALF. I wrote HALF on one balloon and HALF on the other. I put them throughout the room and each student had to get a balloon. Then, they had to find the person with the other HALF of their balloon and come to me to see if they were correct. By far the most fun part of the day! We will definitely be doing this game again! :)
Halfway Day

Halfway Day

Halfway Day

We ran out of time to finish our packet, but it also includes practice for breaking words in HALF as compound words, prefixes & suffixes, and by syllables! We also had a story to finish called "The HALVES and the HALF Nots," using HALF, HALVES, HAVE, and HAVEN'T correctly in the story where they were missing, but we just had TOO much fun and didn't get to finish! But now I know for next year to spend even more time on all the fun!

Well, that was our day! It was absolutely FANTASTIC and I am so thrilled about the success.. I can't WAIT to do it all over again next year! Such a celebration!! Next week we will spend time writing to our pen pals who had the SAME celebration, telling them all about our day! I made a "Happy Halfway Day!" writing paper included in the pack too :)

You can check out the pack by clicking below, if you want to spend your 90th of day of school surprising your class with an amazing day of HALVES! The pictures below allow you to see everything you get to celebrate YOUR HALFWAY DAY!!

Halfway Day

Halfway Day


Happy Halving!