Showing posts with label freebie. Show all posts

Monday, September 19, 2016

Classroom Management Part Six: Zone Time!


Do you have students, that no matter how much you reward him/her or reward everyone else but him/her, they struggle with staying in one spot? Though I didn't implement true flexible seating last year in my classroom (for reasons beyond my control) I did allow my students to option of working around the room whenever possible, and if they had to be at their desk, they could choose to stand or sit. But they had to stay in their area and stay focused the whole time they work (well, as focused as eight year olds can stay...).

One boy in particular really struggled with this. He was allllwaayyyyss wandering around the classroom, especially when I was working with other students in small groups. It drove me bonkers. No matter what I tried, it didn't improve. So, I dealt with it as best I could.

Later in the year, his mom had him meet with a variety of doctors for a variety of different and heart-breaking reasons. After meeting with her, my admin, and our intervention specialist, it was found that he needed boundaries set within the classroom in order to achieve the behavior goals we were implementing for him.

I dubbed this new boundary system  "Zone Time." I set it up for the whole class, not just him. and I apologize that I slacked in taking pictures.. so I'll do my best to paint a picture of what I implemented for you so it is as clearly as I can.

We needed him to work on Zone Time in two ways... first to work on staying in his area when he was working. Due to other poor behavior choices he was making, this was always at his desk for the remainder of the year. He was no longer allowed to work around the classroom. So, since my students' desks were arranged in pods, he needed to stay within his small group area. I outlined this in two ways:
1. washi tape that I put on the floor around the group - it looked like a giant rectangle. I DON'T recommend duct tape...it's quite difficult to remove. Washi tape removes easily, and comes in a variety of different colors.
2. numbers I hung above their pods. I had 4 pods of students, so I cut out a giant 1, 2, 3, and 4 of cardstock, and hung them above the pods.

note* I used numbers, but you could also use colors, animals, let the pods choose their names, etc... whatever works for you. I liked numbers. That way, I could change where my students were sitting and always have the same four zones. Washi tape comes in a bunch of colors so you can really go crazy with colors! I also would have wanted them to match my classroom decor, and I couldn't find what I needed to make it work. So numbers it was. 

The second thing we were working on was staying within his specific working area within the zone. Again, he wasn't allowed around the classroom, so this was his desk area. I didn't always require him to stay within just his desk area. We were working on the broader goal of the group zone first, before honing in on his desk area. But, this was the end of the third grade and he was nine years old. He could fully understand what was expected of him, even if he couldn't always control it, so I pulled him aside to talk about what Zone Time meant for him specifically and when.

My goal for him was to work on staying within his specific working zone (the second, more specific goal - his desk) only when I was working with small groups. If students were told it was "Zone Time" and I was walking around observing/helping students, he could move within the zone, but if I was with small groups he was to stay at his desk. We then had a behavior chart that the intervention specialist created for use at school and home to monitor his success with this goal and he was rewarded appropriately.

So, in the picture you see at the beginning of the post, I created a sign that I hing at the front of the room on my white board. When the sign was hung (and I always announced it as well) it was "Zone Time," and students had to stay in their zone.

It worked wonders. Students still had some freedom to move around, but the visual of the zone created with the washi tape helped cut down on shenanigans from the entire class! I had a class of 18, twelve of which were boys, and half of those boys excelled in shenanigans. This was a great success.. I only wish I had thought of it at the beginning of the school year rather than the end of the year.

If you feel like you might benefit from Zone Time in your class, CLICK HERE to download the sign for free (or click the picture at the beginning of the post)! Take it, and run with it.. make it work in your classroom however you need! and again, I apologize for not having pictures. I was quite pregnant at the end of the school year, we were remodeling our house, and I was preparing to pack up my entire classroom to stay home this year... and pictures just never happened..... but it is quite a simple concept, and how you make it work could vary quite differently in your classroom for your students.. and that's okay!

Let me know how you used this concept, or if you have any questions in the comments below!


Friday, July 22, 2016

Prepping for Baby Mo!

It's been a while since I posted last.... there has been a lot going on! As you might remember from a previous post, my husband and I are expecting our first child [any day now - AHH!] and I wanted to share a little something I have been putting together to help take care of the amazing people who will help me deliver our new little bundle of joy!

First, I wanted to make sure my Hubby was well taken care of while I was in labor, because let's be honest... who knows how long that could be and when! It could start in the middle of the night and last for hooouurrrrsss and I'd prefer he stay conscious in the delivery room! I saw some ideas on Pinterest and then headed to Target to create my own version of the "New Daddy Survival Kit." Here's what I came up with!


My Hubby LOVES sweets. So I made sure to include his favorite candy and granola bars. I also grabbed some Goldfish crackers and almonds and a bag of jerky. Not pictured (and almost already gone because he likes them SO much!) are a pack of Starbucks Mocha Frappucino drinks. I'm thinking we'll need to pick some more up on the way to the hospital for him....


Just before Father's Day, Target had some great shirts for dads, so I grabbed this shirt while it was on sale, as well as the hilarious book "Your Baby's First Word Will Be Dada" by Jimmy Fallon. He laughed out loud as he read it.... literally every page says "Dada." SO cute! 
He loves cars and Mustangs, so when his favorite magazine came in the mail the other day, I stuck it in the basket too, so he would have something to read while we wait.


I also made sure he would have some change on him for the vending machine. I put a bunch of quarters in the envelope so he could get himself some other drinks and snacks during our stay.

I grabbed a bin from my classroom as I was packing it up and made a little sign for it and stuck it on the front..  and that was it! Super simple to put together and he loves it. Now I just have to make sure it makes it to the hospital with us!!

Don't worry... you'll be able to download the sign at the end FOR FREE! :)


We're never gonna survive the birth without some amazing hospital staff, so of course I want them to feel appreciated and taken care of. So, I made two little baskets for the staff and nurses who will be on duty during our stay.


I bought all kinds of candy, gum, snacks, and drinks at Target, using sales, coupons, and the Cartwheel app to help cut costs. I also grabbed some lotion and little hand sanitizers at Bath & Body Works when they had their semi-annual sale in June. I am so excited to leave them at the nurses station so they can treat themselves on their shift and stay fueled while they care for us and our new baby!

New Daddy Survival Kit


I'll be back one day (soon!) to share our little one's arrival with you... I can't wait!


Saturday, March 12, 2016

Clean Desk Award

It was becoming apparent over the last couple of weeks that my students needed a little motivation to work on keeping their desks clean and organized. I mean, some of them were just AWFUL. The worst I'd ever seen. It was time for action!

I've seen "Desk Fairy" notes floating around on blogs & TpT, but my 3rd graders wouldn't buy into that, as most of their parents don't refer to the Tooth Fairy or anything. So, instead, I whipped up my own version really quick Wednesday afternoon. I had some Starbursts, and inspiration just struck!

I simply printed them onto colored cardstock, attached a Starburst with some tape, and wrote an encouraging little note to them!


You can CLICK HERE and grab them for FREE to motivate and reward your students too!


Friday, January 15, 2016

I've got a secret!

I've been keeping a secret, and today I FINALLY shared it with my students and thought I should share it with all of you as well!

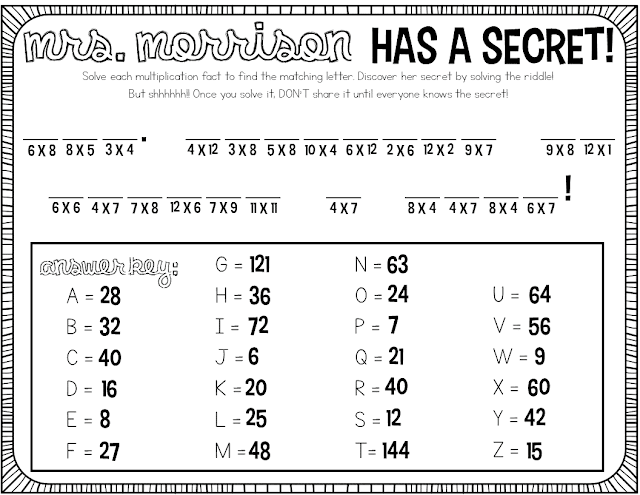
I gave my students this riddle page. They had to solve the multiplication problems and match the products to a letter to solve the code and discover my secret!

Here's it is, so you can take a minute and guess my secret along with my students! I put it on Facebook today as well so that I could finally announce to the rest of our family and friends!

O-H So Blessed

Did you get it?! If you don't want to figure out what it says, here's the answer....

MRS. MORRISON IS HAVING A BABY!

Yep, that's right! I'm pregnant! My husband and I are expecting our first child in July and we are so excited to finally be sharing the news with everyone we know!


I made a version of this fun riddle page for any teacher to use! It says "Your teacher is having a baby!" using multiplication or addition facts, instead of having a specific teacher's name. If you or a colleague ever need to reveal a pregnancy to their class, you can download by clicking here!


Thanks so much for sharing in my secret today with my hubby and I! I can't wait to continue sharing more with you as we continue this new journey!


Thursday, January 7, 2016

Classroom Management Part Four: VIP Students!


V.I.P.

What does that mean to you when you hear that someone is a VIP?

Typically, I think of A-list celebrities and folks who have boatloads of cash. People our society deems "important." I also think of backstage passes to concerts. Generally, that's called a VIP pass, or something. Again, something society deems as "important."

I first saw the idea for this classroom management strategy on Instagram, and WISH I could remember who posted it and even came up with this fabulous idea. I know several of my teacher friends are implementing this in their classrooms, but I want to give credit where credit is due. If you are the originator of this idea, or know who is, and happen to be reading this. My props to you! This idea is fantastic. I love it and give you all of the credit for it! I can take none whatsoever.

That being said, I of course took it and ran with the idea, putting my own spin on it as I always do with anything I see. I would hope that's the mark of a good, creative teacher... I would hope...

Anyhow, here's what a VIP means in my classroom and how I use it for positive motivation.

Right away this school year, I knew I would need a large handful of tricks and tools to implement to keep up with my new students. In my class of 18, twelve are boys. TWELVE! That's a LOT of eight-year-old boy energy. So, when I first saw this VIP idea last school year, I didn't think much of it because I had a well-behaved class of 15, with 13 of them girls. It didn't seem necessary. But this year, boy did it EVER!

So, I finally decided to jump into it when I saw some cool school supplies on clearance at Target one day. There was also this really cool shower caddy that was on clearance for about $4 so I picked up (thinking there was no way I could fill it!) and set out shopping.

You see, the premise for the VIP Student acknowledgement is that these students display above and beyond role model behavior. They are students who really don't need classroom management, because they are responsible, well-behaved, on task, respectful, everything a model student exemplifies. It doesn't mean they are the smartest, brightest, coolest, most popular, prettiest, whatever. It is none of those things. It is about their HEART, in my eyes.

So, after I bought A BUNCH of awesome goodies (more about those in a bit) I thought about what I expected of my VIP students. The next day at school, I asked my students what it meant to them when they heard "VIP" and then asked, "what should that look like in our classroom?"

I was blown away by their responses.


These all came from them. I had no part of it - I just wrote them down. They NAILED it!

I made these signs and badges. Every day, I select 2 student VIPs, and that day they wear these badges and display the signs on their desks. (the little plastic display signs are from Michaels)

I don't have room in my for a special VIP table, so instead the VIPs can choose to sit back with me and the tub of supplies at my table. (I don't have a teacher desk - I sit at our kidney table).


If you like the signs I use, you can download them HERE AS A FREEBIE!

I choose two VIPs almost every day, but sometimes, there aren't any. I don't force the VIP issue. I really make sure my students EARN it. Sometimes, I make notes about who should be VIP (and have even had a wait list before!) but other times, I just go off of memory. Plus, as with every class, I have a handful of "go-to" students who are always on task and reliable.

What I love most about this program is that it really DOES motivate students. I have a boy who comes in EVERY morning when he unpacks and looks to see who are the VIPs. He is highly motivated to earn it, and though he has only twice so far this year, I have seen a notable change in his overall behavior! How fantastic! I also love that I can acknowledge and reward the students who are always strong, positive role models. They earn a positive reward, rather than my giving a negative consequence to the rest of the class. This class has been together for many years (they are the only class in the grade) so they have had their share of challenges over the years. What has also been great about having VIPs, is that parents have also told me they appreciate that students are being recognized in a positive manner, rather than negatively.

So, here are all of the goodies, which I add to frequently!

Glitter glue, glitter markers, neon markers, metallic markers, metallic crayons, glitter crayons, special highlighters, giant highlighters from Target, a fun tape dispenser, Mr. Sketch scented markers, color changing markers (from Dollar Tree), scented erasers, fun-edged craft scissors, and twistable colored pencils.

I will say that it was a bit of an investment, but SO worth it. I keep my eyes open when I am out and about, especially looking in clearance sections. I was able to get the Mr. Sketch markers on clearance at Office Max after the back to school season.

The first day I brought this in, the class was so excited about using them. They were practically DROOLING over it! Their affinity for school supplies rivals my own.. I love it!


Just the other day, I asked them to share with me how it feels to them when they are VIP and why they like being the VIP for the day. Most of the responses I received were something along the lines of  "because it is awesome!" and "I get to use cool supplies!" or "I like using smelly markers." But a few of them touched me and completely blew me away. The impact of the VIP bin and a badge was more than I had ever expected.


This one got to me instantly. As soon as I read it, my heart broke. What must this little boy be feeling when he ISN'T VIP?? I am so glad he shared this, and that I can provide a way for him to feel important in the classroom. I want my students to know that they are special. To know they have value. They were created on and for a purpose, and in my classroom that means something. They are a VIP in God's eyes and I will not deny that either!


They are oh, so special. I want for them to feel special. To know that they are noticed. They are working hard. They are doing well. That I am proud of them and that I see it. I think sometimes it is so easy to focus on the negative behaviors and punishments in the classroom. I say that because I have been and continue to be guilty of it sometimes. I am by no means perfect. But, I am always reflecting and cognizant of where I place my attention. Some negative behaviors warrant addressing, some don't. I prefer to focus on the POSITIVE things my students are doing. The POSITIVE ways they are treating one another and honoring God with their actions, work, and speech every day. It's a choice I can make in response to the choices they make.

I look at it most simply as this: how will they remember feeling in third grade? If they remember that they felt special, I'll feel as though I was successful. If they don't feel as though they were special to me, I'll have failed. Simple as that.


I really loved reading this one too. I was glad this little boy realized that in our classroom, being VIP is EARNED, not given.

About a month ago, I caught two of my sweet girls passing notes to each other. As I read it, it say "student A and student B are so lucky!" (I won't use their names) and she meant they were lucky because they were chosen to be VIPs that day. Though I needed to punish and discuss with them the note passing, I instead focused on the "lucky" part of the note. It bothered me. That word always does. Lucky. I don't like it. It's a major pet peeve of mine... and I will save you from that rant. That's all you really need to know so I'll move on to the rest of the story.... What bothered me was that she didn't see that those two students had EARNED being VIP that day with their hard work the day before. She missed it completely. So, we stopped and talked about it as a class. We reviewed the anchor chart we had made about being VIP, and how it isn't "lucky" to be able to do those things. It comes from discipline and hard work. We are not jealous of those who are VIPs, we are excited for and encourage them because they earned it.

I think it goes along well with the feeling special from above. I certainly don't want them to feel "better than" someone else. I don't allow bragging or boasting in anyway either. But I hope that it instills within themselves some small amount of pride and confidence that they are doing well, that they are loved, that they are special.

Because they are.


Tuesday, October 6, 2015

Book It: Reading Tracking Made Simple!

Do you and your students participate in the Book It program? If so, I have a simple and easy way for you to track your students' reading minutes!

I created these bookmarks that serve as a dual purpose: bookmarks & reading minute trackers!
It's this simple: every night that your students read for 20 minutes, they [actually - their parents!] punch a hole in bookmark with a hole puncher. At the end of the month, when all the holes have been punched, they turn it in to your for the Pizza Hut pizza certificate! That's IT! {I also told my students that parents could X or color in the circles with a Sharpie if they didn't have a hole puncher on hand!}

To make them, I just printed them onto Astrobrights colored cardstock, laminated them [so they would be more durable all month], and cut them out. When I passed them out to my students, I wrote their name on the back with a Sharpie and they put them in the pouch in their Take Home Binders for reading at night. 

Simple and DONE! I might just do this every month, it's just too easy!


Click the picture above to DOWNLOAD THEM FOR FREE!
I also included a second option that says "October Reading" in case you don't participate in the Book It program but want to have your students keep track of their reading at night. There are 24 circles, for 24 total nights of reading.

Enjoy!


reading minutes tracker

Friday, September 11, 2015

Sticky Note Lesson Plans & Erin Condren

Lesson planning with post-it notes in the Erin Condren Teacher Planner

Hey friends!

I am so excited about this post because that picture above just makes my {teacher} heart SO HAPPY! I absolutely love lesson planning and looking at my lesson planner because, well.. just LOOK AT THAT! Those colors, those fonts, and that organization. It's too much! GAHH!

SOOOO... anyhow.. enough of my gushing... I guess I should start telling you WHY it's there!

If you've been on my Facebook page, Instagram, or Pinterest at all, it might look a tad familiar.

There's a post & YouTube video floating around that I've already done telling all about how I create my Erin Condren Teacher Planner with sticky notes.

However, I have been able to take this gorgeous masterpiece of a plan book... and improve upon it EVEN MORE! say whaaat!? I know! I didn't think this was at all possible either.. but it is!

So... if you first need to read the original post about how I did that... do that RIGHT HERE. RIGHT NOW.

Then come on back and read what's NEW AND IMPROVED!


So...let's play a game and see if you can SPOT THE DIFFERENCE:
Lesson planning with post-it notes in the Erin Condren Teacher Planner

Did you find it?

Here's what's new.... MY SUBJECT LABELS! noooww take a look!:
Lesson planning with post-it notes in the Erin Condren Teacher Planner

It may seem silly... but can I just say how WONDERFUL it is to not have to hand write almost anything in my planner these days!?!

Thanks to the genius of my friend Lisa over at Fourth and Ten and her beautiful Instagram post, I no longer have to write in my subject headers and times! Using Avery Return Address Labels [and all of the patience I can muster!] I created these subject and time labels for my planner! Now, I spend even LESS TIME setting up my planner week to week. I simply put in the labels, washi tape for our snack & lunch breaks, and I'm good to go.

Here's what a bunch of them printed out looks like:


I think I am even going to try doing my dates on them too so literally nothing is written in anymore. Another plus? If I mess up or decide to change something I can just cover it up with another and be none the wiser!

So, I know you might be asking "how do you make the labels in color?" Well, this is where that patience I mentioned [and don't have much of!] comes in. When you download and open the template [which you can get here for free from Avery] in Microsoft Word. I select the box in the template and go to "Format" >> "Shape Fill." Then, select the color you want the background to be. Of course, you can leave it white. But I went ahead and gave mine a rainbow pattern. Then, I overlay a text box [which I make translucent] and format my text. I copy and paste the text boxes to fill one column with the same label format. So, the first column is my red "Morning Work" label, the second is the orange "Bible" label, the third alternates "Science," "Health," & "History" in yellow since that's how I will be teaching it this year [rotating through each content over the course of the whole year] and then the last column on the page is the green "Math" label. Then, once I save the file, I close it and copy the entire file itself and paste it onto my desktop. I rename it (something I'll remember that corresponds) and change the text boxes to the times for each of those same subjects. That way the colors are already done and I just have to change the text and formatting.

I say it takes patience because Microsoft Word is finicky when it comes to layering and I spent a lot of time adjusting the text boxes so they would line up well. But, now that it's done it looks great and was well worth the frustration!

>>> If you click here, you can download one of my label files and give them a try to see what I mean. You'll need the font CartonSix so it looks right and go from there so some of the formatting is done for you! Remember..it's in WORD. I'm sorry!

PRINTING TIP >>> once you create those labels, you will need to save them as a PDF in order to print. The first time I went to print I didn't do that.. and they didn't bring with the color fill. So I have some pages of just plain white labels. Anybody want them!?

I bought the Avery Return Address Labels on Amazon... you can get a box of 2000 here and have them for at least 2 years, if not more.. it just depends how many you use a week. Right now, I use 19 a week, but if I print the dates like I think I will that will be 24 a week x at least 34 weeks of planning for 816 labels a year. 2000 divided by 816 is 2.45 years... not bad for about $7!

For your enjoyment, here's another look at the goodness of all the supplies I use when I am putting it all together...

Lesson planning with post-it notes in the Erin Condren Teacher Planner
You can see in the top right that I used labels to insert when I do our daily Read Aloud under other plans because I didn't have room elsewhere. It works great! I love that the post-it allows for TWICE the planning room. You can lift them up and jot notes, ideas, and changes underneath for future reference [and hide them with the post-it!]


Happy Planning!


Last Minute Lessons: Post Your Thoughts


Sometimes, the best laid plans happen on the fly. It happens for me quite a bit. I'm a spontaneous, just wingin' it, let it happen naturally kind of lesson planner. [wow, that sounds terrible!] BUT, I do plan. Don't get me wrong. I know what content I am covering and when. I know what I will expect my students to do. I know the rigor. But, I don't write scripts. I fit my lessons plans on post-its, for goodness sake. One post-it for a subject, and the whole week fits on a two-page spread. I don't list objectives or standards [I'm blessed not to have to!] I let God lead my teaching. He inspires me, He provides, HE has the BEST ideas!

So.. what does that all have to do with this post? Well, it's exactly what happened this morning and I' thought I'd share with you how it came about.

I was in the shower [the best thinking always happens there! right!?] and I was thinking about my science lessons. For a lot of the time, our lessons come straight from our science books that are a part of our school's curriculum. I find myself easily putting it off or skipping it some days because, well, it's boring. Don't get me wrong, the content is fantastic and we DO have fun with experiments sometimes (I'm working on that!) but our day-to-day lessons are just reading about it. It gets boring and let's face it.. if it's taught in a whole group, they aren't going to listen to me read it to them and Round Robin Reading isn't exactly a best practice. Just ask Jen Jones. So, in trying to solve my own problem and jazz up my teaching in content areas like science & health, I came up with a quick "Post Your Thoughts" informal assessment activity.

I quickly created a template for standard 3x3" sticky notes to fit on. I stuck them on the boxes [you can baarreelly see them in the pic up top, on the left] and labeled the post-its with my students' numbers [so they remained generally anonymous to their classmates when they posted their thoughts but I knew what their answers were] and assigned the reading.

They were to read a chunk from our science books on their own, at their own pace. Usually, we read things together in small groups or whole group, and we highlight important information that might be seen on a quiz or test. Since this was an independent study session, I laid out MY teacher copy and let them come over to look at it, if needed, where they could see the parts I had highlighted. After they got started and I explained how they would use the post-it notes, I let them start reading. After they were all engaged in reading, I then wrote the questions I had for them to find on the board. Why did I decide to wait? So they actually READ EVERYTHING, and didn't just skim in order to find the answers and be done.

So, each question was color-coded for a certain post-it [as you can see on the right]. When they found the answer, they wrote it on the corresponding sticky note and put it on the board right under the question.


As soon as everyone was finished, we talked about what we read, highlighted some important information, and answered those questions. My students read at their own pace, and I now have a small formative assessment piece to show their understanding. They did FANTASTIC! I was super proud of them, seeing as this was the first time we did something like this this school year.... and it's only the TENTH DAY! They loved it, and I definitely seeing us do this activity much more often!

So what do you think? Would you have your students "Post their Learning"? If so, you can grab my template for FREE >>>> right here!

Just print, copy, and cut in half to use! You could even laminate a set, and make them reusable year after year for just about any content area or reading assignment!


Monday, June 15, 2015

One Bulletin Board... all year long!

There is one common thing a lot of teachers seem to dread about their classroom.... BULLETIN BOARDS.

Now, I may be crazy... okay, okay, I AM CRAZY. But I don't mind bulletin boards one bit. I LOVE decorating them, finding fun colors and items to use, and thinking of a creative play on words for the title.

I think the one thing teachers get hung up on is hanging the paper and border every time. (you see what I did there!? #punnerd)  and for me, I only dislike it because I have a GIGANTIC bulletin board and an affinity for patterned wrapping paper. So recovering it every time takes about 2 rolls of paper and seems wasteful.


So this year, I decided to try putting up my paper and border ONCE and leaving it up all year, no matter what I changed it to for the season. I did this last year too, and it seemed to work well, so I thought I would document it for you and see what you think about it. It miiiight just make the task a tad less daunting for you... hopefully!


Here's some tips for how I did it...


Choosing a neutral background is the most important.. which is why I listed it first. Something neutral is going to be able to go with a variety of themes, colors, and seasons. I chose this navy blue striped wrapping paper from Target. It's simple with clean lines and has the potential to match a lot of things.

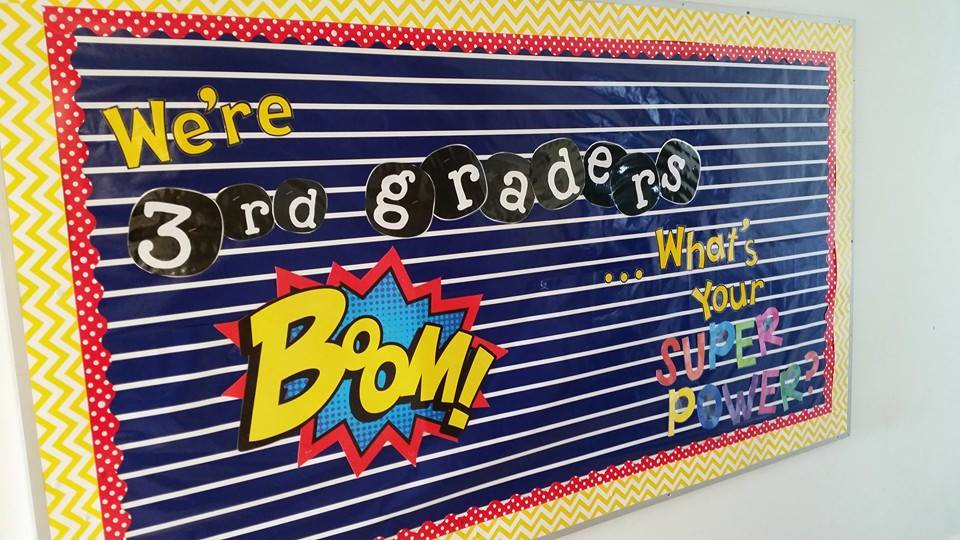
The year started with a super hero theme, so I matched it accordingly with my borders and other decor::
This went up in August and stayed until November-ish.


I use white thumb tacks to put up my borders. This makes it easier for me to change them down the road if I want to, because removing staples is a pain. It is also super easy to hide them in the border and then they aren't really even seen then! Like the polka dot border above... I just put a tack right on top of a dot and boom.. camouflaged.

Bonus: less holes in your border when you take it down compared to staples.
Double Bonus: you don't need to use a staple remover, so you're less likely to rip it!


..and then change ONE of them. I changed the bulletin board a tad late into the year... and when it started to snow I used this idea I found on Pinterest. I left up the red polka dot border that I had used before and just changed the yellow chevron to gray chevron.... same background but a much softer look for winter with the gray. I changed one piece at at time and it was so simple, compared to taking it allll down and putting something new up.

This stayed up November-ish until March. Winter is long in Ohio!
Click the picture to download the writing prompt paper for FREE!

To make the snowglobe, I traced the clear plastic plates I bought at a party store and drew on the bottom part for the globe freehand. I traced them on cardstock and the students cut them out.

I took their pictures all bundled up in their winter gear in the hallway. By taking them horizontally so that my students' entire bodies were in the picture and printing them as a 4x6" photo, they were able to JUST fit perfectly inside the plate!

I let my students decorate the inside to MATCH their story (so we did the writing process and activity first) and then we made the snow globe.

I mixed white glue and shaving cream for puffy paint for the snow and we broke out the glitter to decorate the bottoms of the snow globes (if they wanted... which they all did, of course!)

After they were completely dry (this took a few days) I hot glued the edge of the plate the cardstock snow globe. It's important to leave a small edge beyond what you trace so that there is room for the plate and paper to attach well. Beware: this uses a LOT of hot glue!

To hang them, I attached a small loop of yarn to the back of the globe with hot glue as well, but that is completely optional, depending on how you want to display them!  This has been one of my most favorite craftivities to date! I highly recommend it!


It's not always easy... so think about it. I had to kind of plan before I could make this bulletin board. I needed something to keep the blue. It reminded me of the sky so that idea led to finding something with clouds, and a Pinterest search led me to the balloon idea, which inspired the title. A little planning goes a long way, if you take a bit of time to do it. So don't rush the bulletin board change. It's okay if you don't change it immediately. Your board is still cute if you wait a week!

Here, you can see I just changed the inside border but left the gray. I went from red polka dots to hot pink on the inside. A few white thumb tacks stand out, but still look cute.
This bulletin board stayed up from late March and into May.


 Don't try to overdue it. I let the borders and background colors speak for the design the most and add just a few touches. A few fun fonts for the title and that's all I needed. The bright yellow pops against the blue and the cloud from the last board stayed up.. then I just added in my students' writing craftivity and that was that. I put this up in May and it stayed up until the end of the year.


and that was that. I made it last all year. I bought those two rolls of wrapping paper for about $6 at Target and made it last all year. I strategically covered any tears or worn out spots with the other items I put up and it didn't look bad through all 9 months... and I didn't have the headache of putting up new paper every time I did a new one.


What do you think? Would this solve your frustration with bulletin boards? Would you try it!?
Let me know in the comments below!


Friday, February 27, 2015

MATH groups: [A] At your seat


So.. you saw how I started to introduce my MATH groups (hopefully it made sense!) as well as what students are expected to in during [M]ath fact time in my last post...

Now, here is what is involved during [A]... which is At your seat.

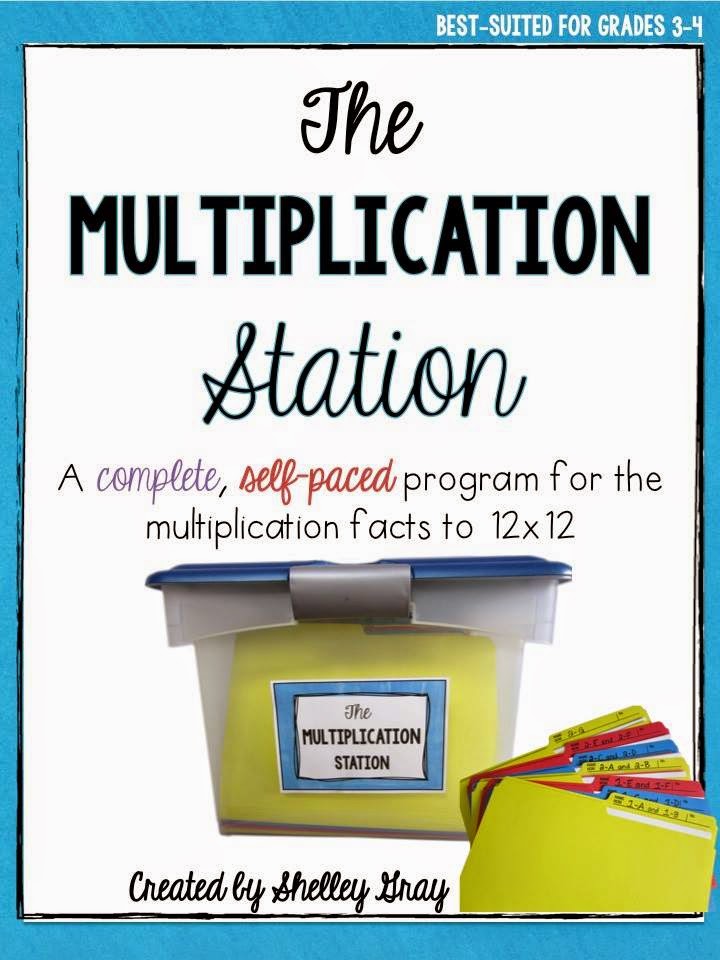
There are a lot of options you could do with this as well. This is intended to be the time that students compete independent practice of a particular skill. Again, my focus is multiplication, so I am using The Multiplication Station from Shelley Gray. It is am amazing self-paced program designed to help students not just memorize their multiplication facts, but help them master multiplication as a whole with meaningful practice of several skills.  I started to introduce it by introducing the pages for the Zeros and Ones as a whole group. We did one or two a day together until we had worked through them all.
One of the fantastic things about her station is that there are so many different activities to practice all of the facts. They include directions and several examples so that students can do everything on their own, but I still wanted to introduce this to my students since it was a brand new activity and the zeroes & ones facts are perfect because of the simplicity. We were able to focus on how to read the page and complete the activity rather than focus on solving the answers. I wanted them to feel confident in their abilities to figure out how to complete each page. Solving for the correct products would come with strategies I would be teaching. Does that make sense to you? It does to me... but what does that really mean? haha

Once we began full rotations, my students keep track and pace themselves through the entire program. It follows a particular order for teaching the facts, so that is the order I followed when they made their flashcards so there would be consistency in all areas. She includes ALL of the information you and your students need to understand how the program works... and it really does. It amazes me every day how well all of my students work through this completely on their own (mostly!) I usually still have students come to me to ask a question, but it's usually to make sure they are completing a page correctly or ask a quick question. But overall, they manage it so smoothly. They have become so responsible using this, and additionally, I think it helps them as problem solvers. Because I am teaching during this time (which is the next station I will post about) they have to figure out problems they encounter on their own. I think that is a fantastic life skill you have to learn!

Here's some photos of my students working hard during this time, as well as a look at what they use to track their progress.


This is how I have all of the files stored. I put multiples activity sheets into one folder to save on the number of folders I would need. I also copied many of them front & back so that it would save paper. 


I also laminated the answer keys front to back and put them in the same folders as the activities to make them easy to find, and to save on laminating sheets.


 Next to our Multiplication Station I have a magazine-style holder. This is where all of my students keep their personal trackers. They are in page protectors which have their student number on them. I wanted them to stay nice and neat, and prevent them from getting lost in the shuffle of their desks.


This is a progress tracker. She likes rainbows....and organization :)


This student finished activity 2C, so she is checking her work on the answer key. If she finishes both the front and back, and checks them with the key, she will then put it in the same bin where she keeps her tracker. I look through it daily just to check over their progress and monitor how they are doing. I like to do that for my own "formative assessment." Basically, keep an eye on their independent learning! After a quick look over them, I send them home.


This student is working on 2F and will then work on 2G. After she finishes all of 2G, she is ready for her 2s test, as long as she feels comfortable and ready and KNOWS THEM FLUENTLY! They tell me when they are ready and I write down the date they are ready with the fact set I need to test them on. I test several kids a day on several different fact sets. 


Here's how I keep that organized (it's a part of the freebie you found in the last post and if you click the picture here you can get it, too!)


If they pass, I just put a check mark next to their name. If they miss any facts, I write how many they missed and circle it. I retest them usually the next day. 

I keep track of their progress through the fact tests in the checklist section of my Erin Condren Teacher Planner like this:


The tests they take are very basic. I use the format that I got in 


I keep "answer keys" I made for each set on my clipboard (which is becoming a HOT mess between my tracking sheets for MATH stations and the Daily 5!) Here's a look at that:


I am so very happy with this purchase! It is quite a bit of prep to get The Multiplication Station set up and ready to use, between copying, finding a filing & storage system, and prepping the answer keys, but I promise you it is well worth it. It is by far one of the best investments I have made for curriculum supplementation!

What do you think of MATH group implementation so far??
I hope you find it do-able! There are SO many options you can do for each station when you really start exploring it. [A]t your seat time could include any printables that allow students to independently practice the skill on which you are currently working. You could use your school-provided curriculum worksheets or textbook problems at this time also. 

What are your ideas? I'd love to read your thoughts for inspiration for my future use of this!