

Now, I may be crazy... okay, okay, I AM CRAZY. But I don't mind bulletin boards one bit. I LOVE decorating them, finding fun colors and items to use, and thinking of a creative play on words for the title.
I think the one thing teachers get hung up on is hanging the paper and border every time. (you see what I did there!? #punnerd) and for me, I only dislike it because I have a GIGANTIC bulletin board and an affinity for patterned wrapping paper. So recovering it every time takes about 2 rolls of paper and seems wasteful.
So this year, I decided to try putting up my paper and border ONCE and leaving it up all year, no matter what I changed it to for the season. I did this last year too, and it seemed to work well, so I thought I would document it for you and see what you think about it. It miiiight just make the task a tad less daunting for you... hopefully!
Here's some tips for how I did it...
Choosing a neutral background is the most important.. which is why I listed it first. Something neutral is going to be able to go with a variety of themes, colors, and seasons. I chose this navy blue striped wrapping paper from Target. It's simple with clean lines and has the potential to match a lot of things.
The year started with a super hero theme, so I matched it accordingly with my borders and other decor::
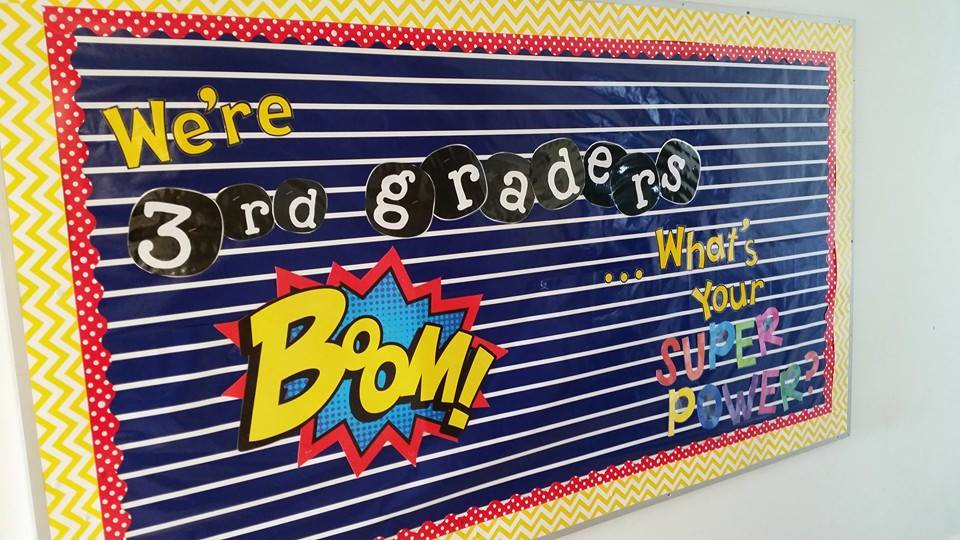
This went up in August and stayed until November-ish.

I use white thumb tacks to put up my borders. This makes it easier for me to change them down the road if I want to, because removing staples is a pain. It is also super easy to hide them in the border and then they aren't really even seen then! Like the polka dot border above... I just put a tack right on top of a dot and boom.. camouflaged.
Bonus: less holes in your border when you take it down compared to staples.
Double Bonus: you don't need to use a staple remover, so you're less likely to rip it!

..and then change ONE of them. I changed the bulletin board a tad late into the year... and when it started to snow I used this idea I found on Pinterest. I left up the red polka dot border that I had used before and just changed the yellow chevron to gray chevron.... same background but a much softer look for winter with the gray. I changed one piece at at time and it was so simple, compared to taking it allll down and putting something new up.


This stayed up November-ish until March. Winter is long in Ohio!
Click the picture to download the writing prompt paper for FREE!
To make the snowglobe, I traced the clear plastic plates I bought at a party store and drew on the bottom part for the globe freehand. I traced them on cardstock and the students cut them out.
I took their pictures all bundled up in their winter gear in the hallway. By taking them horizontally so that my students' entire bodies were in the picture and printing them as a 4x6" photo, they were able to JUST fit perfectly inside the plate!
I let my students decorate the inside to MATCH their story (so we did the writing process and activity first) and then we made the snow globe.
I mixed white glue and shaving cream for puffy paint for the snow and we broke out the glitter to decorate the bottoms of the snow globes (if they wanted... which they all did, of course!)
After they were completely dry (this took a few days) I hot glued the edge of the plate the cardstock snow globe. It's important to leave a small edge beyond what you trace so that there is room for the plate and paper to attach well. Beware: this uses a LOT of hot glue!
To hang them, I attached a small loop of yarn to the back of the globe with hot glue as well, but that is completely optional, depending on how you want to display them! This has been one of my most favorite craftivities to date! I highly recommend it!

It's not always easy... so think about it. I had to kind of plan before I could make this bulletin board. I needed something to keep the blue. It reminded me of the sky so that idea led to finding something with clouds, and a Pinterest search led me to the balloon idea, which inspired the title. A little planning goes a long way, if you take a bit of time to do it. So don't rush the bulletin board change. It's okay if you don't change it immediately. Your board is still cute if you wait a week!

Here, you can see I just changed the inside border but left the gray. I went from red polka dots to hot pink on the inside. A few white thumb tacks stand out, but still look cute.
This bulletin board stayed up from late March and into May.

Don't try to overdue it. I let the borders and background colors speak for the design the most and add just a few touches. A few fun fonts for the title and that's all I needed. The bright yellow pops against the blue and the cloud from the last board stayed up.. then I just added in my students' writing craftivity and that was that. I put this up in May and it stayed up until the end of the year.


and that was that. I made it last all year. I bought those two rolls of wrapping paper for about $6 at Target and made it last all year. I strategically covered any tears or worn out spots with the other items I put up and it didn't look bad through all 9 months... and I didn't have the headache of putting up new paper every time I did a new one.
What do you think? Would this solve your frustration with bulletin boards? Would you try it!?
Let me know in the comments below!

LOVE this!! I love keeping up one background paper all year too! I love all of your different displays! Great job!!
ReplyDeleteMrs. 3rd Grade
Harrah's Resort Southern California Casino - MapYRO
ReplyDeleteHarrah's Rincon Casino and Resort. Valley Center, CA 92082 760-751-4133. Directions 구미 출장마사지 · (760) 543-3100. 충청북도 출장마사지 Call 양산 출장샵 Now · More Info. 시흥 출장마사지 Hours, Attire, Wi-Fi, PokéStop. 당진 출장안마